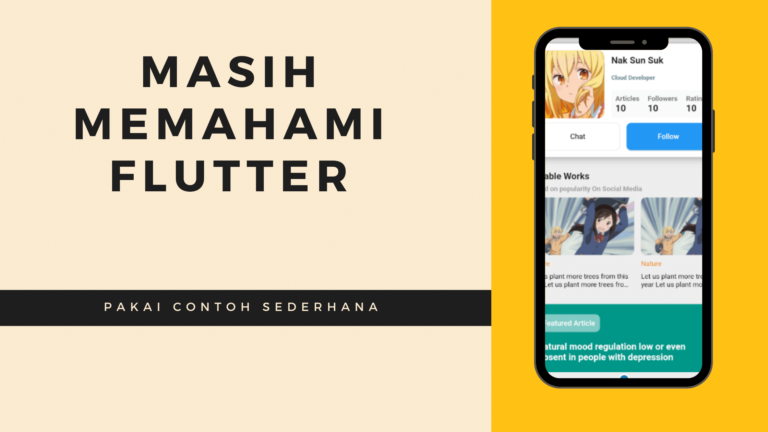
Tampilan Aplikasi
Ya namanya masih belajar, dan ini blog buat belajar bareng, ya ini deh contoh aplikasinya, apa adanya. Jadi saya jelaskan, di contoh ini ada 3 widget utama, yang pertama profile card yang paling atas, yang kedua, ditengah itu intinya list item, yang ketiga itu banner.
Inisialisasi IDE
Tahap Pertama inisialisasi pembuatan flutter terlebih dahulu:
Buka visual studio code, lalu jalankan terminal built in visual studio code dengan sintaks berikut:
- cd where_directory
- flutter create –org firsttutorflutter.com fot
Nah, nanti akan kebuat tuh folder fot yang built ready buat pengembangan flutter.
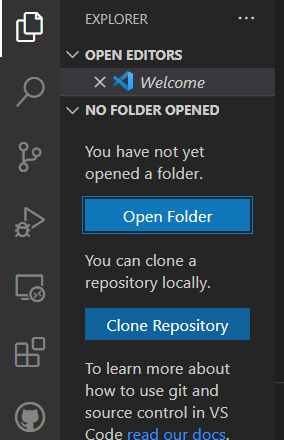
Kemudian pilih papers icon pada visual studio code, open folder, cari dan select folder fot yang mana tempatnya pas di where_directory mu
Overall, Tampilan IDEnya akan jadi seperti ini,
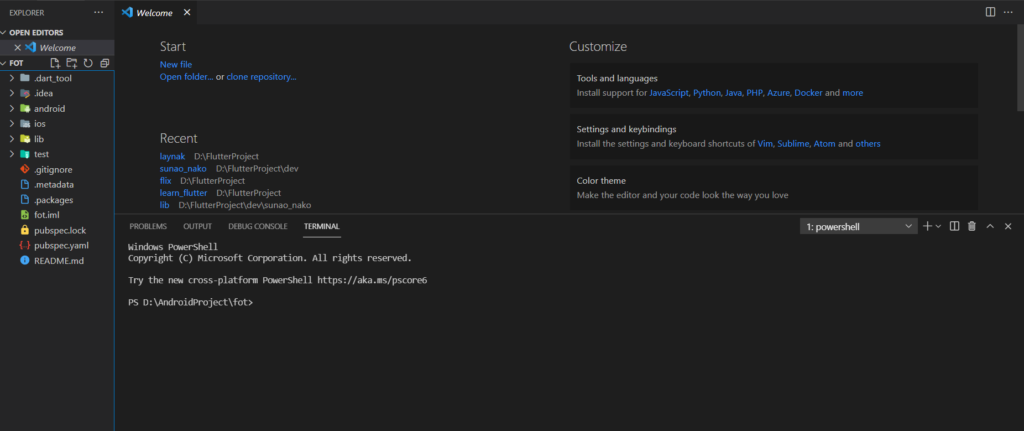
list folder di dalam fot beserta script-scriptnya plus terminal sudah default ke direktori fot
Lanjut jalankan emulatornya
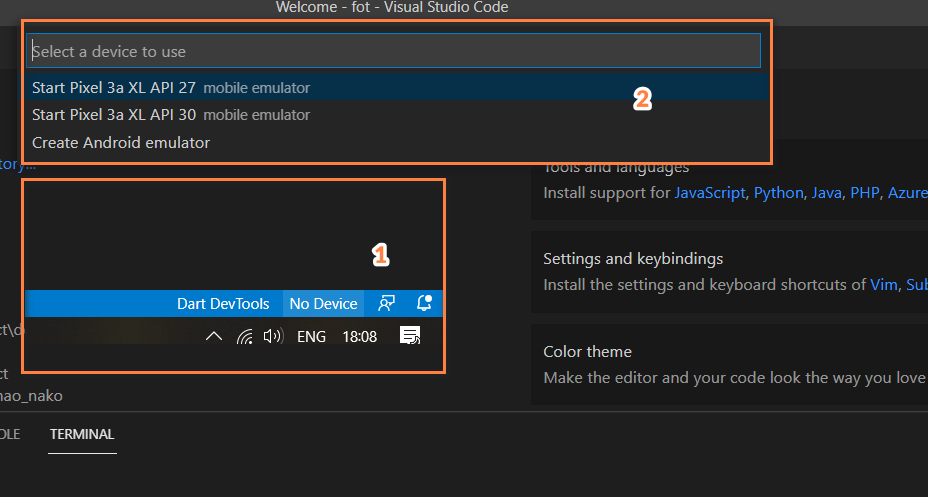
Biar Mempermudah, ini ada shortcut sederhana
ctrl + shift + r buat munculin flutter code template
Shift + Alt + F buat ngerapihin
Shift + Alt + arrow down buat ngecopy deret code berulangCTRL + Space buat suggest
Destruktur Default Boilerplate
Saat destruktur, posisi desain seperti ini :
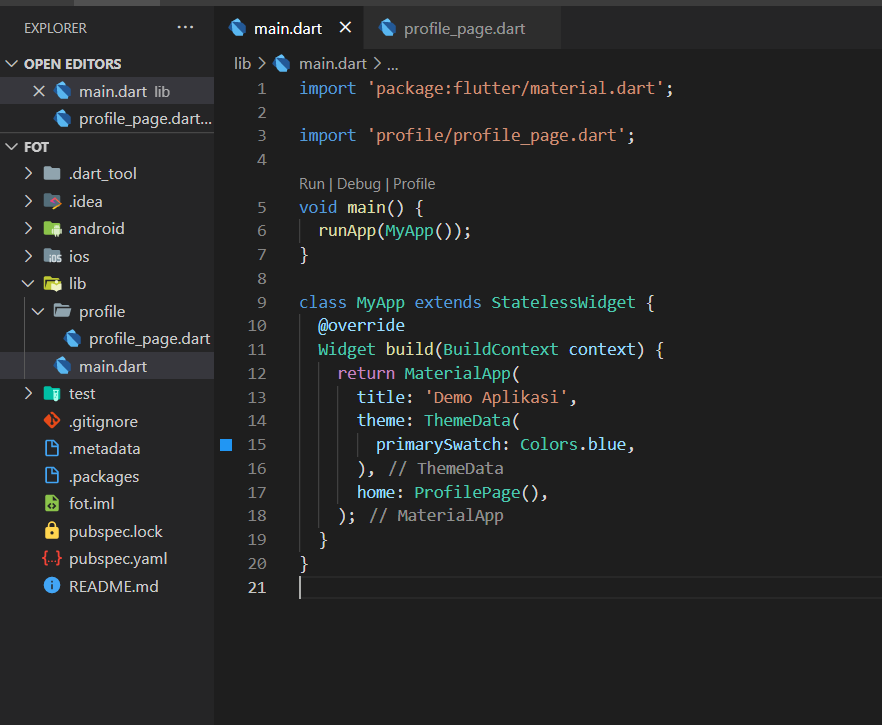
main dart, fungsinya untuk tema, dan memanggil deklarasi awal untuk “Widget Page yang akan pertama diload”, yaitu pada home
import 'package:flutter/material.dart';

import 'profile/profile_page.dart';

void main() {
  runApp(MyApp());
}

class MyApp extends StatelessWidget {
  @override
  Widget build(BuildContext context) {
    return MaterialApp(
      title: 'Demo Aplikasi',
      theme: ThemeData(
        primarySwatch: Colors.blue,
      ),
      home: ProfilePage(),
    );
  }
}
Profile Page, ini akan jadi main activity dari kumpulan banyak widget menjadi satu
import 'package:flutter/material.dart';
import 'package:flutter/widgets.dart';

import 'widget/profile_information.dart';

class ProfilePage extends StatefulWidget {
  ProfilePage({
    Key? key,
  }) : super(key: key);

  @override
  _ProfilePageState createState() => _ProfilePageState();
}

class _ProfilePageState extends State<ProfilePage> {
  @override
  Widget build(BuildContext context) {
    return Scaffold(
      backgroundColor: Colors.grey[50],
      body: SafeArea(
          child: Column(
        children: [
          ProfileInformationWidget(),
        ],
      )),
    );
  }
}
Kalau kalian perhatikan pada ProfilePage terdapat deklarasi custom ProfileInformationWidget, itu adalah stateless widget yang bisa dibuat generate langsung dengan shortcut statel lalu ctrl + space atau statelessw, nanti akan muncul opsi StatelessWidget, pilih, lalu ketik nama classnya yaitu ProfileInformationWidget.
Menambah Akses Gambar
Di flutter untuk mengakses gambar (atau file lain), kita bisa deklarasikan folder tempat menyimpan gambar tersebut, caranya, cukup buat foldernya, di sini, saya buat folder asset lalu dalamnya lagi ada folder images
Lalu pada flutter, kita buka pubsec.yaml, silahkan uncomment lalu modify sesuai dengan relative posisi direktori folder gambar tadi

Kalau aku jadinya seperti ini
  assets:
    - assets/images/
Sekarang mari membuat main widget Flutternya
Membuat Profile Info
sekarang kita ke basic buat outernya dulu
    return Container(
      //Ini dekorasi kolom penampung
      width: double.infinity,
      height: 250,
      decoration: BoxDecoration(boxShadow: [
        BoxShadow(
            color: Colors.grey,
            spreadRadius: 2,
            blurRadius: 15,
            offset: Offset.fromDirection(90)),
      ]),
      //Ini untuk isi kolom penampung
      child: Column(),
    );
Jadi kita inisialisasi width dengan ukuran maksimum, lalu heightnya 250, tambahkan dekorasi
sekarang kita tambahkan warna boxnya di dalam decoration paramnya
     decoration: BoxDecoration(boxShadow: [
        BoxShadow(
            color: Colors.grey,
            spreadRadius: 2,
            blurRadius: 15,
            offset: Offset.fromDirection(90)),
      ], color: Colors.white, borderRadius: BorderRadius.circular(10)),
      // Set Widget padding margin
      margin: EdgeInsets.all(10),
      padding: EdgeInsets.all(15),
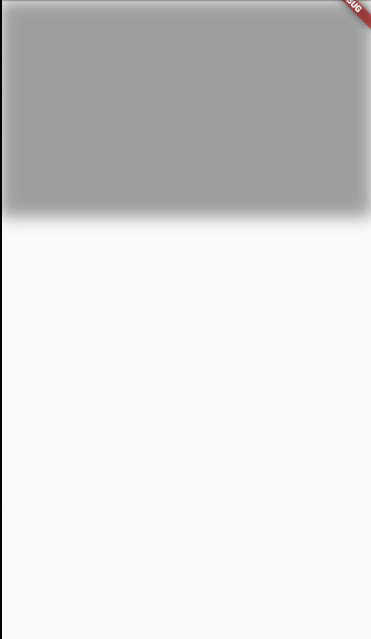
Jadilah kotak
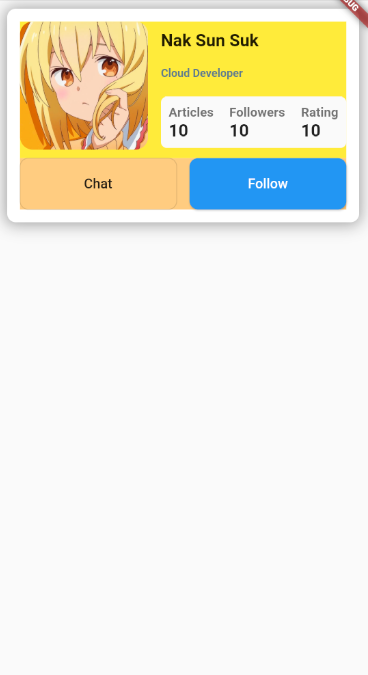
Kode untuk seluruh bagian card profile
import 'package:flutter/material.dart';
import 'package:flutter/widgets.dart';

class ProfileInformationWidget extends StatelessWidget {
  const ProfileInformationWidget({Key? key}) : super(key: key);

  @override
  Widget build(BuildContext context) {
    return Container(
      //Ini dekorasi kolom penampung
      width: double.infinity,
      height: 250,
      decoration: BoxDecoration(boxShadow: [
        BoxShadow(
            color: Colors.grey,
            spreadRadius: 2,
            blurRadius: 15,
            offset: Offset.fromDirection(90)),
      ], color: Colors.white, borderRadius: BorderRadius.circular(10)),
      // Set Widget padding margin
      margin: EdgeInsets.all(10),
      padding: EdgeInsets.all(15),
      //Ini untuk isi kolom penampung
      child: Column(
        //Rata Kiri
        crossAxisAlignment: CrossAxisAlignment.start,
        children: [
          // Bagian user info
          Container(
            height: 160,
            color: Colors.yellow,
            // Ini untuk foto profile  dan informasi user
            child: Row(
              children: [
                //Container untuk foto
                Container(
                  width: 150,
                  margin: EdgeInsets.only(bottom: 10),
                  decoration: BoxDecoration(
                      image: DecorationImage(
                          image: AssetImage('assets/images/nak.jpg'),
                          fit: BoxFit.cover),
                      borderRadius: BorderRadius.circular(15)),
                ),
                // Container untuk user infos
                // Flexible mempengaruhi keputusan child
                Flexible(
                    child: Container(
                  margin: EdgeInsets.only(left: 15, top: 10),
                  child: Column(
                    crossAxisAlignment: CrossAxisAlignment.start,
                    mainAxisSize: MainAxisSize.max,
                    children: [
                      Text(
                        "Nak Sun Suk",
                        // bila teks penuh
                        overflow: TextOverflow.ellipsis,
                        maxLines: 1,
                        style: TextStyle(
                            fontSize: 20, fontWeight: FontWeight.bold),
                      ),
                      SizedBox(
                        height: 20,
                      ),
                      Text(
                        "Cloud Developer",
                        // bila teks penuh
                        overflow: TextOverflow.ellipsis,
                        maxLines: 1,
                        style: TextStyle(
                            color: Colors.blueGrey,
                            fontSize: 13,
                            fontWeight: FontWeight.bold),
                      ),
                      SizedBox(
                        height: 20,
                      ),
                      Flexible(
                        child: Container(
                          decoration: BoxDecoration(
                              color: Colors.grey[50],
                              borderRadius: BorderRadius.circular(7)),
                          height: 60,
                          // color: Colors.grey,
                          child: Row(
                            mainAxisAlignment: MainAxisAlignment.spaceAround,
                            children: [
                              InformationValueBox(
                                subtitle: "Articles",
                                value: "10",
                              ),
                              InformationValueBox(
                                subtitle: "Followers",
                                value: "10",
                              ),
                              InformationValueBox(
                                subtitle: "Rating",
                                value: "10",
                              ),
                            ],
                          ),
                        ),
                      ),
                    ],
                  ),
                ))
              ],
            ),
          ),
          // Bagian Button bottom
          Flexible(
              child: Container(
            color: Colors.orange[200],
            child: Row(
              crossAxisAlignment: CrossAxisAlignment.stretch,
              children: [
                Expanded(
                  flex: 1,
                  child: OutlineButton(
                      shape: RoundedRectangleBorder(
                          borderRadius: BorderRadius.circular(10)),
                      child: Text(
                        "Chat",
                        style: TextStyle(fontSize: 16),
                      ),
                      onPressed: () => {}),
                ),
                //Tambah space antar tombol
                SizedBox(
                  width: 15,
                ),
                Expanded(
                    flex: 1,
                    child: RaisedButton(
                      onPressed: () {},
                      color: Colors.blue,
                      child: Text(
                        "Follow",
                        style: TextStyle(fontSize: 16, color: Colors.white),
                      ),
                      shape: RoundedRectangleBorder(
                          borderRadius: BorderRadius.circular(10)),
                    ))
              ],
            ),
          ))
        ],
      ),
    );
  }
}

class InformationValueBox extends StatelessWidget {
  const InformationValueBox(
      {Key? key, required this.subtitle, required this.value})
      : super(key: key);

  final String subtitle, value;

  @override
  Widget build(BuildContext context) {
    return Column(
      mainAxisAlignment: MainAxisAlignment.center,
      crossAxisAlignment: CrossAxisAlignment.start,
      children: [
        Text(
          subtitle,
          style: TextStyle(
            fontWeight: FontWeight.bold,
            fontSize: 15,
            color: Colors.black54,
          ),
        ),
        Text(
          value,
          style: TextStyle(
            fontWeight: FontWeight.bold,
            fontSize: 20,
            color: Colors.black87,
          ),
        ),
      ],
    );
  }
}
sebenarnya untuk image ini kita bisa pakai
child: Image.asset('assets/images/namaimage.jpg' atau pakai
child: FittedBox(
                  child: Image.asset('assets/images/namaimage.jpg'),
                  fit: BoxFit.fill,
),
Tapi saya ingin memberikan efek melengkung di setiap sisi, jadi saya pilih boxdecoration kemudian mempunyai background image.
Perbedaan Expanded dan Flexible?
dalam flutter gak jauh-jauh amat bedanya, Expanded itu berusaha untuk match parent dan Flexible itu hanya mengisi seadanya atau wrap content, yang jadi kelebihan dari flexible adalah ketika misal isi dari yang diwrap itu kebesaran, misal teksnya kepanjangan, otomatis teks sisa akan muncul dibawah, sedangkan expanded akan muncul error bila widget yang diwrap kebesaran. Istilahnya Flexible (fit: FlexFit.tight) = Expanded() Yeah, secara default Flexible itu FlexFit.loose.
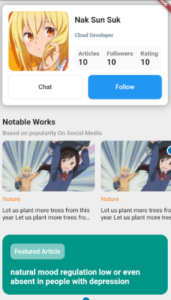
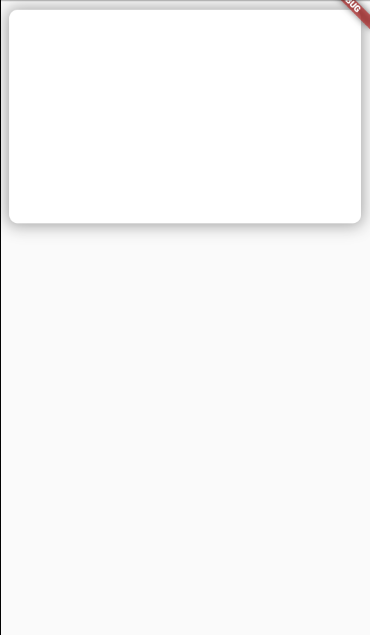
BTW, Berikut ini hasil jadinya
Membuat List Discovery Widged
Kali ini kita buat list view pada flutter, sekarang kita tidak buat class, tapi function :3, dan itu di dalam file profile_page
ini just fun saja, tapi kalian bisa rubah stateless widget ke statefull widget caranya klik ctrl + shift + r pada area extend StatelessWidget, oke untuk full codenya seperti ini
import 'package:flutter/material.dart';
import 'package:flutter/widgets.dart';

import 'widget/profile_information.dart';

class ProfilePage extends StatefulWidget {
  ProfilePage({
    Key? key,
  }) : super(key: key);

  @override
  _ProfilePageState createState() => _ProfilePageState();
}

class _ProfilePageState extends State<ProfilePage> {
  @override
  Widget build(BuildContext context) {
    return Scaffold(
      backgroundColor: Colors.grey[50],
      body: SafeArea(
          child: Column(
        children: [
          ProfileInformationWidget(),
          SizedBox(
            height: 20,
          ),
          Container(
              margin: EdgeInsets.only(left: 10),
              child: _listDiscoveryData(
                  "Notable Works", "Based on popularity On Social Media")),
        ],
      )),
    );
  }
}

Widget _listDiscoveryData(String title, String subtitle) {
  return Container(
    width: double.infinity,
    child: Column(
      crossAxisAlignment: CrossAxisAlignment.start,
      children: [
        Column(
          crossAxisAlignment: CrossAxisAlignment.start,
          children: [
            Text(title,
                style: TextStyle(
                  fontSize: 20,
                  fontWeight: FontWeight.bold,
                )),
            SizedBox(
              height: 8,
            ),
            Text(subtitle,
                overflow: TextOverflow.ellipsis,
                maxLines: 1,
                style: TextStyle(
                    fontSize: 15,
                    fontWeight: FontWeight.bold,
                    color: Colors.grey))
          ],
        ),
        SizedBox(
          height: 10,
        ),
        Container(
          height: 200,
          //list perlu di wrap dengan container untuk deklarasi weight
          child: ListView.builder(
              scrollDirection: Axis.horizontal,
              itemBuilder: (context, index) {
                return Container(
                  width: 230,
                  margin: EdgeInsets.only(right: 15),
                  child: Column(
                    children: [
                      Flexible(
                        flex: 6,
                        child: Container(
                          width: 230,

                          decoration: BoxDecoration(
                              borderRadius: BorderRadius.circular(10),
                              image: DecorationImage(
                                  fit: BoxFit.cover,
                                  image: NetworkImage(
                                    "http://www.world-art.ru/animation/img/10000/9660/10.jpg",
                                  ))),
                        ),
                      ),
                      SizedBox(
                        height: 10,
                      ),
                      Flexible(
                        flex: 3,
                        child: Container(
                          decoration: BoxDecoration(
                            borderRadius: BorderRadius.circular(10),
                            color: Colors.lightBlue.shade50,
                          ),
                          child: Flex(
                            direction: Axis.vertical,
                            crossAxisAlignment: CrossAxisAlignment.start,
                            children: [
                              Text(
                                "Nature",
                                style: TextStyle(
                                    fontSize: 15,
                                    color: Colors.yellow.shade900),
                              ),
                              SizedBox(
                                height: 10,
                              ),
                              Flexible(
                                child: Text(
                                    "Let us plant more trees from this year Let us plant more trees from this year",
                                    maxLines: 2,
                                    overflow: TextOverflow.ellipsis,
                                    style: TextStyle(
                                        fontSize: 15, color: Colors.black)),
                              ),
                            ],
                          ),
                        ),
                      ),
                    ],
                  ),
                );
              }),
        ),
        SizedBox(
          height: 15,
        ),
      ],
    ),
  );
}
ItemBuilder Akan mereturn list widgets, ListViews itu strict dan perlu deklarasi ukuran height, makannya perlu diwrap dulu dengan Container dan mau discroll kemana
Jadinya akan seperti ini

Basic Routing
Kita akan nyoba basic routing guys
kita buat file dart baru namanya homepage.dart, classnya saya iseng buat statefull, biar ada contoh bagaimana mengambil parameter yang dipass kalau statefull
import 'package:flutter/material.dart';
import 'package:flutter/widgets.dart';

class HomePage extends StatefulWidget {
  //deklarasi string untuk paramater
  HomePage({Key? key, required this.title}) : super(key: key);
  final String title;
  @override
  _HomePageState createState() => _HomePageState();
}

class _HomePageState extends State<HomePage> {
  @override
  Widget build(BuildContext context) {
    return SafeArea(
      child: Scaffold(
        appBar: AppBar(
          title: Text(widget.title), //Manggilnya pakai variable widget yang mana auto ada
        ),
        body: Column(children: [
          Container(
            margin: EdgeInsets.only(top: 20),
            child: Center(
              child: ElevatedButton(
                onPressed: () => {
                  Navigator.of(context).pop(),
                },
                style: ElevatedButton.styleFrom(
                  primary: Colors.teal,
                ),
                child: Text(
                  'Go To Profile',
                ),
              ),
            ),
          )
        ]),
      ),
    );
  }
}
lalu pada dart profile_information itu ada tombol, tambahkan onPress, kalau saya, saya pilih chat button
                  Expanded(
                    flex: 1,
                    child: OutlineButton(
                        shape: RoundedRectangleBorder(
                            borderRadius: BorderRadius.circular(10)),
                        child: Text(
                          "Chat",
                          style: TextStyle(fontSize: 16),
                        ),
                        onPressed: () {
                          Navigator.of(context).push(MaterialPageRoute(
                              builder: (context) => OtherPage(
                                    title: 'From Profile Page',
                                  )));
                        }),
                  ),
Sekarang coba didemokan dengan cara klik tombolnya, dan lihat hasilnya,
Navigator of content lalu push maksudnya navigasi dari konteks yang mana konteks ini adalah activity sekarang ini, lalu push, pust ini mereturn route dan dalam flutter ada built in route yaitu MaterialPageRoute.
Navigator.of(context).pop() berfungsi untuk kembali ke halaman aktif sebelumnya.
Nah untuk widget featured artikel, kalian coba kerjakan menggunakan tutorial yang tersedia

Join our list
Subscribe to our mailing list and get interesting stuff and updates to your email inbox.
0 Comments